

What Is a Pelletizer Blade and Why Terminology Matters
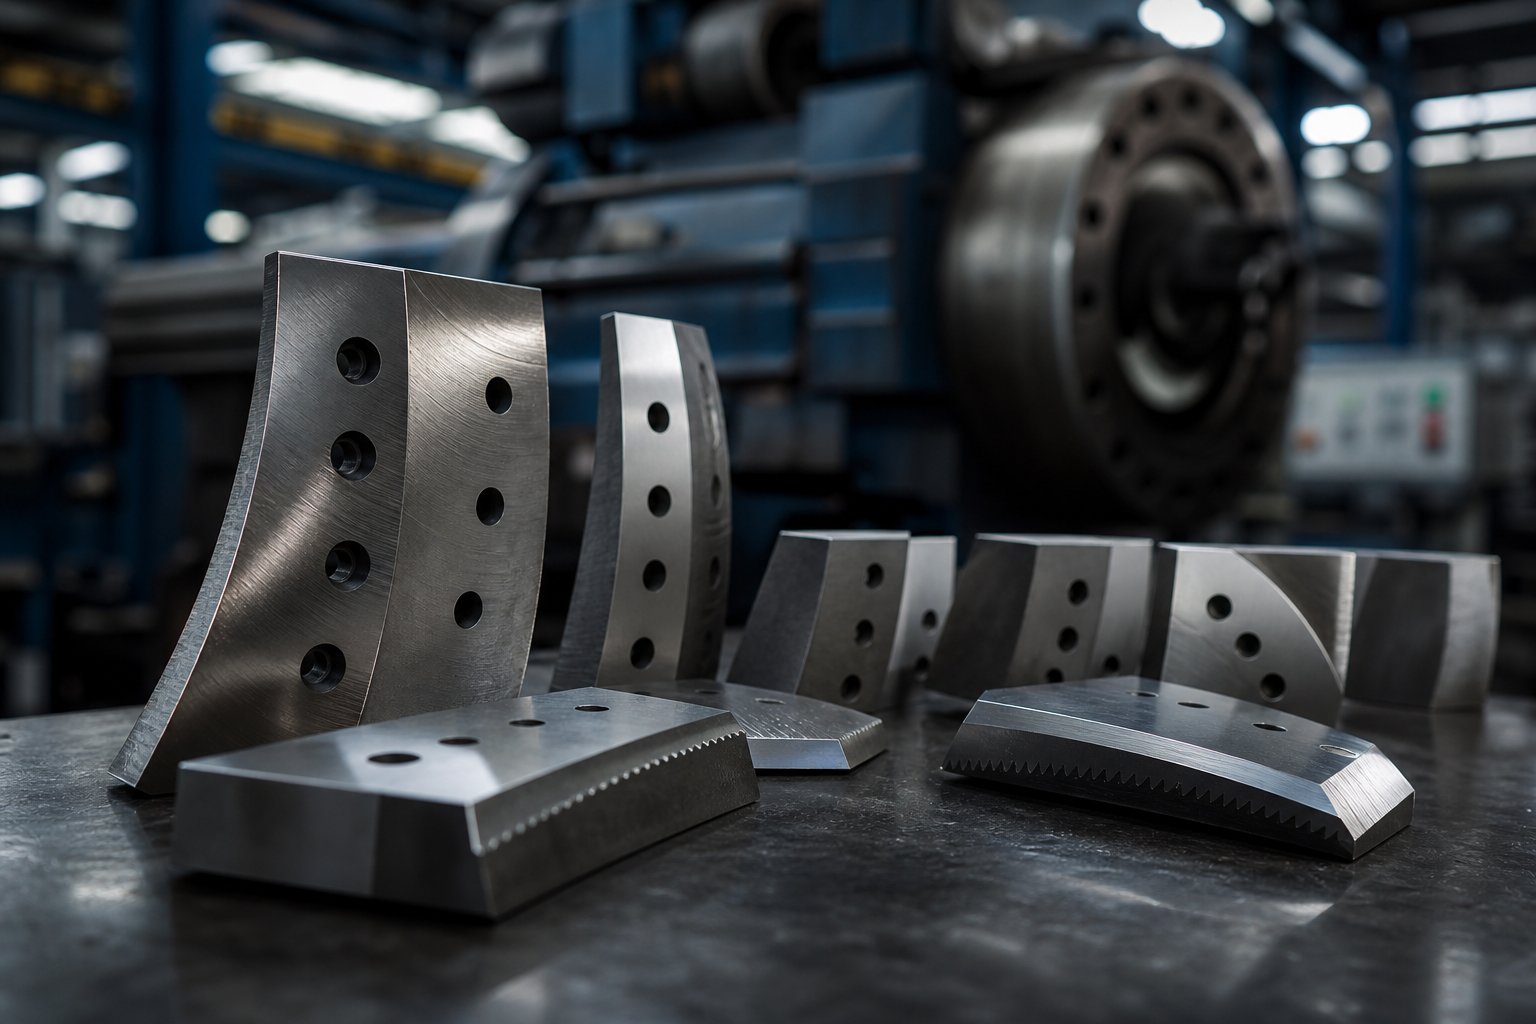
A pelletizer blade is the precision-ground cutting tool that severs extruded polymer — either molten or cooled — into discrete, uniform pellets at the final stage of the extrusion line. Without it, you'd have continuous strands of plastic with no way to turn them into the manageable granules that feed injection molders, blow molders, and downstream manufacturing processes.
What a Pelletizer Blade Actually Does
Imagine molten polymer being forced through a die head, emerging as strands or as a melt face. The pelletizer blade sits immediately downstream — mounted in the pelletizer unit — where it performs the critical severing action that transforms continuous material into individual granules. In strand systems, cooled strands are pulled across a stationary bed knife while rotating blades shear them into cylindrical pellets. In hot-cut systems, the blade sweeps directly across the die face, slicing molten polymer the instant it exits. Either way, the pelletizing knife function in extrusion is identical in purpose: produce clean, consistent cuts at high speed without deforming the pellet or generating excess dust.
Clearing Up the Naming Confusion
Search for replacement cutting tools and you'll encounter a maze of overlapping terms. The industry has never standardized its vocabulary, which makes navigating supplier catalogs frustrating. Here's a practical breakdown of what each term typically means:
- Pelletizer blade / Pelletizer knife / Pelletizing knife — Functionally interchangeable terms describing the individual cutting edge used in a pelletizing system. Supplier preference or regional convention usually dictates which term appears in a catalog.
- Granulator blade — Refers to knives used in granulators, which are size-reduction machines that shred or grind plastic waste into irregular flakes. A granulator reduces material before pelletizing, so its blades serve a fundamentally different purpose than a pelletizer blade.
- Pelletizing cutter / Die face cutter blade — Sometimes refers to the individual blade, but may also describe the entire rotating cutting assembly (hub, blades, and drive shaft). Confirm with the supplier whether they're quoting a single blade or the complete unit.
- Bed knife / Stationary knife — The fixed cutting edge against which rotary blades shear the polymer. It's part of the pelletizer blade system but distinct from the rotating blades.
Understanding the difference between a granulator blade and a pelletizer blade is especially important: one breaks down scrap into rough flakes, while the other creates the finished, uniform pellets that manufacturers actually buy. Confusing the two leads to ordering the wrong part entirely.
With terminology sorted, the real complexity begins — because not all pelletizer blades share the same geometry, material, or design. The cutting method your system uses dictates everything about how that blade is shaped and what it's made from.
Types of Pelletizer Blades for Plastic Extrusion
A pelletizer blade designed for one cutting method can fail spectacularly in another. That's because the pelletizing process itself — how the polymer is cooled, where the cut happens, and what state the material is in at the moment of contact — shapes every detail of blade geometry, material grade, and wear behavior. You'll notice that suppliers rarely explain these distinctions clearly, which leaves buyers guessing when they need replacements. The taxonomy below breaks down blade types by the pelletizing method they serve, so you can match the right blade to the right system every time.
Strand Pelletizer Blades
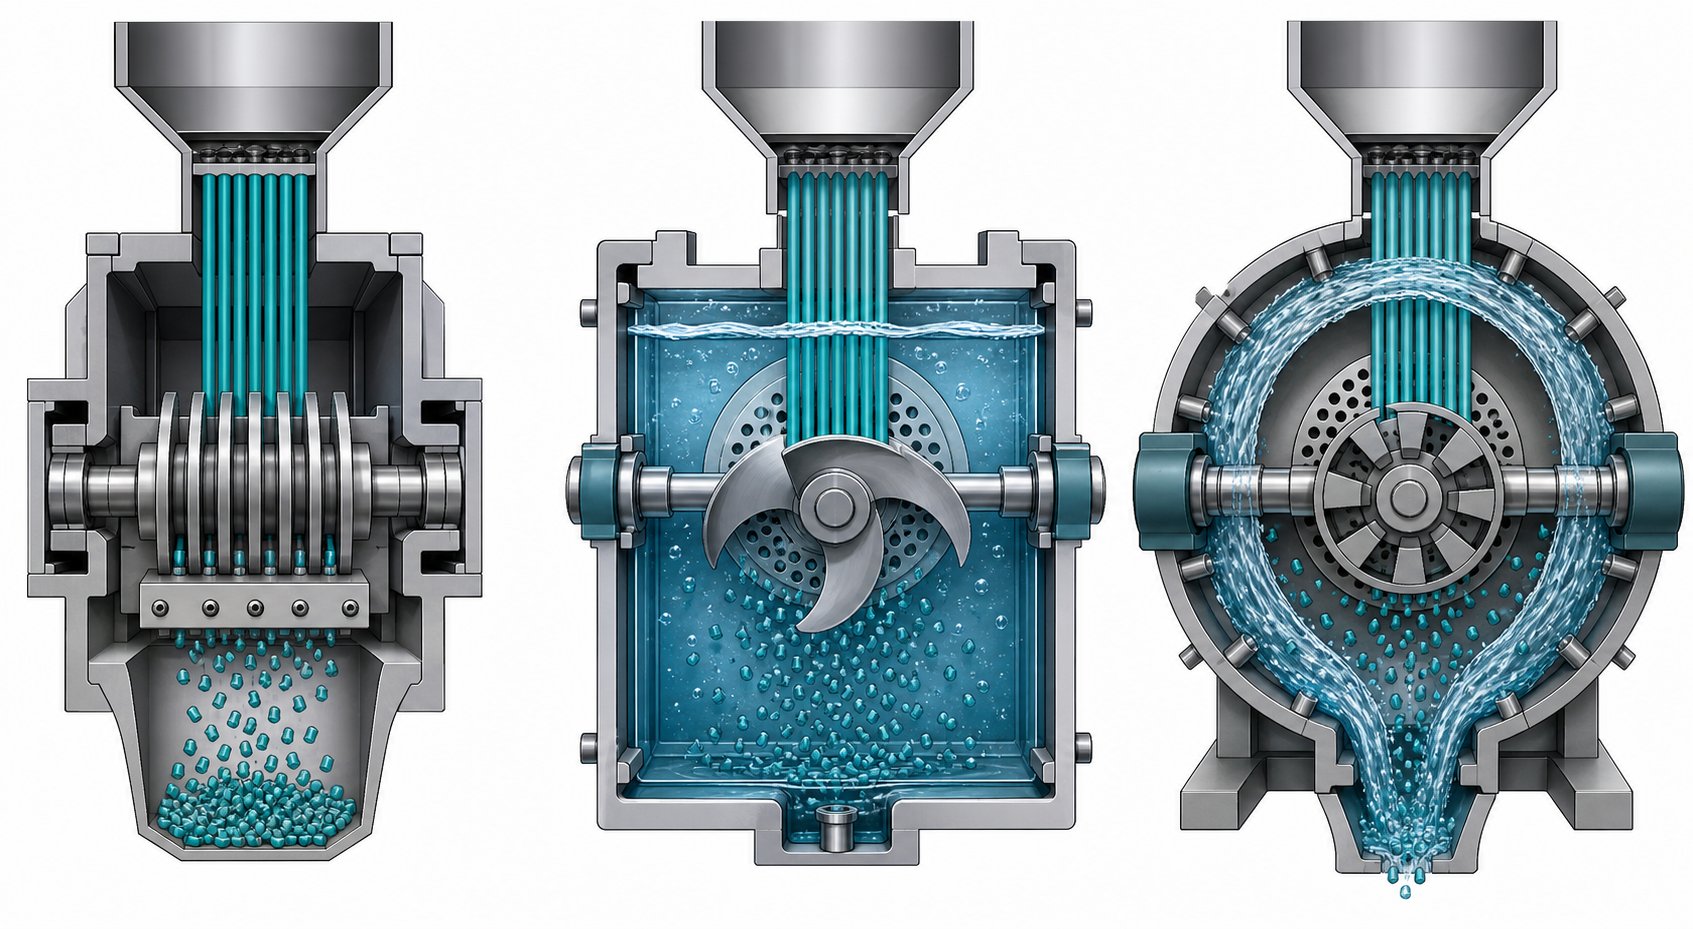
In a strand pelletizing system, molten polymer is extruded through a die head to form continuous strands, cooled in a water bath, then pulled by a haul-off unit into the pelletizer where rotating blades shear the solidified strands against a fixed bed knife. The result is clean, cylindrical pellets with a predictable length.
Because the polymer has already cooled and solidified before it reaches the cutting zone, strand pelletizer blade geometry tends to be relatively straightforward. These blades typically feature straight cutting edges, moderate hardness ratings, and sharp edge angles optimized for shearing rigid material rather than slicing through a soft melt. The primary stresses are mechanical — impact loading from the repeated strike against the cooled strand and abrasive wear from filled compounds. Thermal stress is minimal since the blade never contacts molten polymer directly.
Strand systems are popular for rigid plastics like ABS, PS, and PC, as well as engineering and modified plastics. The blade's job here is precision and repeatability: pellet length depends on the synchronization between haul-off speed and blade strike frequency. When that sync drifts, you'll see inconsistent pellet sizes — a problem that often gets blamed on the blade but actually originates upstream.
Underwater and Hot Die-Face Pelletizer Blades
Underwater pelletizer blade design represents an entirely different engineering challenge. In these systems, molten polymer is extruded through a die plate directly into a water-filled cutting chamber, where rotating blades slice the melt at the die face. The pellets solidify almost instantly as the surrounding water quenches them into spherical or near-spherical shapes.
Hot die-face pelletizer blade requirements overlap significantly with underwater systems. Both demand blades that can withstand sustained high temperatures at the die face — often exceeding 200 degrees Celsius — while resisting polymer adhesion that causes buildup, smearing, and eventual cut-quality degradation. The blade design is typically disc-shaped or features a curved profile engineered to maintain precise, uniform contact as it sweeps across the die plate radius. Even small deviations in flatness or parallelism create uneven cuts, leading to deformed pellets and accelerated wear on both the blade and the die.
The stress profile for these blades is dominated by thermal cycling and chemical adhesion rather than raw mechanical impact. Blades heat up during contact with the melt, then cool as they rotate through the water or air stream, creating repetitive thermal expansion and contraction that can induce microcracking over time. Coatings such as TiN, TiAlN, or CrN are frequently applied to reduce sticking and extend edge life — a critical consideration for high-MFI materials and engineering resins like PET and PA that tend to adhere aggressively to uncoated steel surfaces.
Water-Ring Pelletizer Blades
Think of the water-ring method as a hybrid sitting between strand and underwater systems. Here, molten polymer is extruded through the die head and cut by high-speed rotating blades at the die face — similar to underwater pelletizing. However, instead of a fully submerged cutting chamber, a spinning ring of water cools and conveys the pellets away from the cut zone.
Water-ring pelletizer blade specifications reflect this middle-ground position. The blades encounter hot polymer at the die face, so they need reasonable thermal resistance, but the thermal demands are less extreme than in a fully submerged underwater system. Mechanically, the blade must handle the same rotational cutting action and maintain consistent contact pressure against the die plate. These systems often feature self-adjusting cutting heads that keep blade pressure stable, which reduces the precision burden on the blade itself but doesn't eliminate the need for proper geometry and material selection.
Water-ring pelletizers are widely used for PE and PP films, woven bags, and other lightweight, soft plastics — applications where the combination of moderate cost, simple operation, and decent pellet quality makes them the most practical choice.
The table below maps each pelletizing method to its corresponding blade characteristics, giving you a quick-reference framework for understanding why specs vary so dramatically from one system to the next.
| Pelletizing Method | Typical Blade Geometry | Cutting Temperature | Primary Blade Stress Factors | Common Polymer Applications |
|---|---|---|---|---|
| Strand Pelletizing | Straight-edge, flat profile | Cold (solidified strands) | Mechanical impact, abrasive wear | ABS, PS, PC, engineering plastics |
| Underwater Pelletizing | Disc-shaped or curved to match die plate | Hot (molten polymer at die face) | Thermal cycling, polymer adhesion, thermal fatigue | PET, PA, high-MFI materials, high-end compounds |
| Hot Die-Face Pelletizing | Curved or contoured to sweep die face | Hot (molten polymer at die face) | Sustained heat exposure, adhesion, thermal expansion | PE, PP, heat-sensitive specialty polymers |
| Water-Ring Pelletizing | Flat or slightly curved, moderate profile | Hot (die face contact with partial water cooling) | Moderate thermal stress, mechanical wear, adhesion | PE/PP films, woven bags, soft plastics |
This framework reveals something important: blade geometry and material grade aren't choices you make in isolation. They're consequences of the pelletizing method. A straight-edge tool steel blade that performs beautifully in a strand system would fail rapidly in an underwater pelletizer, where thermal cycling and polymer adhesion demand entirely different properties. That distinction between how blades move — spinning on a rotor versus sitting fixed as an anvil — adds yet another layer of complexity to getting the specification right.
Rotary Pelletizer Blade vs Bed Knife: How They Work Together
Every pelletizer blade in a cutting chamber falls into one of two categories: it either spins or it stays put. That sounds simple, but the distinction between the rotary blade and the stationary bed knife is one of the most overlooked — and most consequential — factors in pellet quality, blade longevity, and maintenance planning.
How Rotary Blades Work
The rotary blade mounts directly onto the pelletizer rotor and spins at high RPM to deliver the cutting action. Imagine a multi-armed rotor whipping through hundreds or even thousands of revolutions per minute — each blade strikes the polymer strand or melt at precisely timed intervals, severing it into individual pellets.
Three variables determine the quality of that cut. First, rotor speed: faster rotation produces shorter pellets for a given feed rate, but it also increases impact forces on the cutting edge. Second, blade count — more blades on the rotor mean more cuts per revolution, which affects pellet length uniformity and throughput capacity. Third, blade pitch angle — the angle at which the cutting edge meets the polymer — influences how cleanly the material shears versus tears.
Because rotary blades spin continuously under load, they experience centrifugal forces pulling them outward and cyclic impact loading every time they contact material. This combination creates a distinctive rotary blade wear pattern in pelletizer systems: the leading edge dulls progressively, and over extended runs, you may notice slight rounding or microchipping concentrated at the point of first contact. The material grade must balance hardness for edge retention against enough toughness to absorb repeated shock without fracturing — a tradeoff that varies with rotor speed and polymer type.
The Role of the Stationary Bed Knife
While the rotary blades do the striking, the stationary bed knife for pelletizer systems provides the anvil — the fixed cutting edge against which strands are sheared. Also called the anvil blade, this component sits rigidly in the pelletizer housing, positioned so the spinning blades pass across it with a tightly controlled gap.
Here's where pelletizer bed knife alignment becomes critical. The clearance between the rotary blade edge and the bed knife edge — often measured in hundredths of a millimeter — directly controls pellet shape, cut cleanliness, and dust generation. Industry experts at Bay Plastics Machinery emphasize that worn bed knives are among the most common failure points in strand pelletizers, with degradation showing up as broken edges, chipping, and uneven wear patterns that quickly translate into poor pellet quality. A gap that's too wide produces tails, strings, and incomplete shearing. Too tight, and you get metal-on-metal contact — accelerating wear on both components, generating heat, and in worst cases creating sparking hazards.
Unlike rotary blades, the bed knife wears in a localized band along its contact zone rather than across a sweeping arc. That wear pattern tends to be more gradual but also more insidious: operators often don't notice bed knife degradation until pellet quality has already drifted significantly.
The functional differences between these two blade types are worth mapping out clearly:
- Motion type: Rotary blades spin at high RPM; bed knives remain stationary and absorb the shearing force passively.
- Wear pattern: Rotary blades wear along the leading cutting edge from cyclic impact; bed knives wear in a narrow contact band from repeated shearing pressure.
- Replacement frequency: Rotary blades typically require more frequent replacement or regrinding because they absorb the full impact energy; bed knives last longer but must be inspected regularly for hidden edge damage.
- Alignment sensitivity: Both are alignment-critical, but the bed knife position sets the baseline — if it shifts even slightly, every rotary blade on the rotor is affected simultaneously.
The key takeaway? Treating these as independent components is a mistake. A freshly sharpened set of rotary blades paired with a worn, misaligned bed knife will produce the same poor pellet quality as dull rotary blades on a perfect bed knife. They function as a matched system — the gap between them, the parallelism of their edges, and the condition of both cutting surfaces must all be evaluated together during every maintenance cycle. Replacing one without inspecting the other is a shortcut that almost always costs more in rework and downtime than it saves.
This system-level thinking extends beyond geometry and alignment into the materials each component is made from. The demands placed on a rotary blade — cyclic impact, centrifugal stress, thermal exposure in hot-cut systems — differ fundamentally from the steady shearing load a bed knife endures, and those differences drive very different material requirements.
Pelletizer Blade Material Selection Guide: Steels, Carbides, and Ceramics
Different motion types, wear patterns, and stress profiles between rotary blades and bed knives all point toward one unavoidable question: what should the blade actually be made from? The answer is rarely obvious because pelletizer blade materials span a wide spectrum — from conventional tool steels costing a few dollars per edge to tungsten carbide inserts that command ten times the price but can outlast steel by an even larger margin. Picking the wrong material doesn't just waste money on the blade itself. It triggers a cascade of hidden costs: premature dulling, excessive fines, unplanned downtime, and pellet quality drift that may not show up until downstream customers start rejecting shipments.
The sections below break down every major material category used in pelletizing knives, explain what makes each one suited — or poorly suited — to specific operating conditions, and consolidate the data into a single reference table you can bring to your next procurement discussion.
Common Blade Steel Grades and Their Properties
Most pelletizer blades on the market fall into one of four steel families. Each delivers a different balance of hardness, toughness, wear resistance, and cost — and understanding those tradeoffs is the foundation of smart material selection.
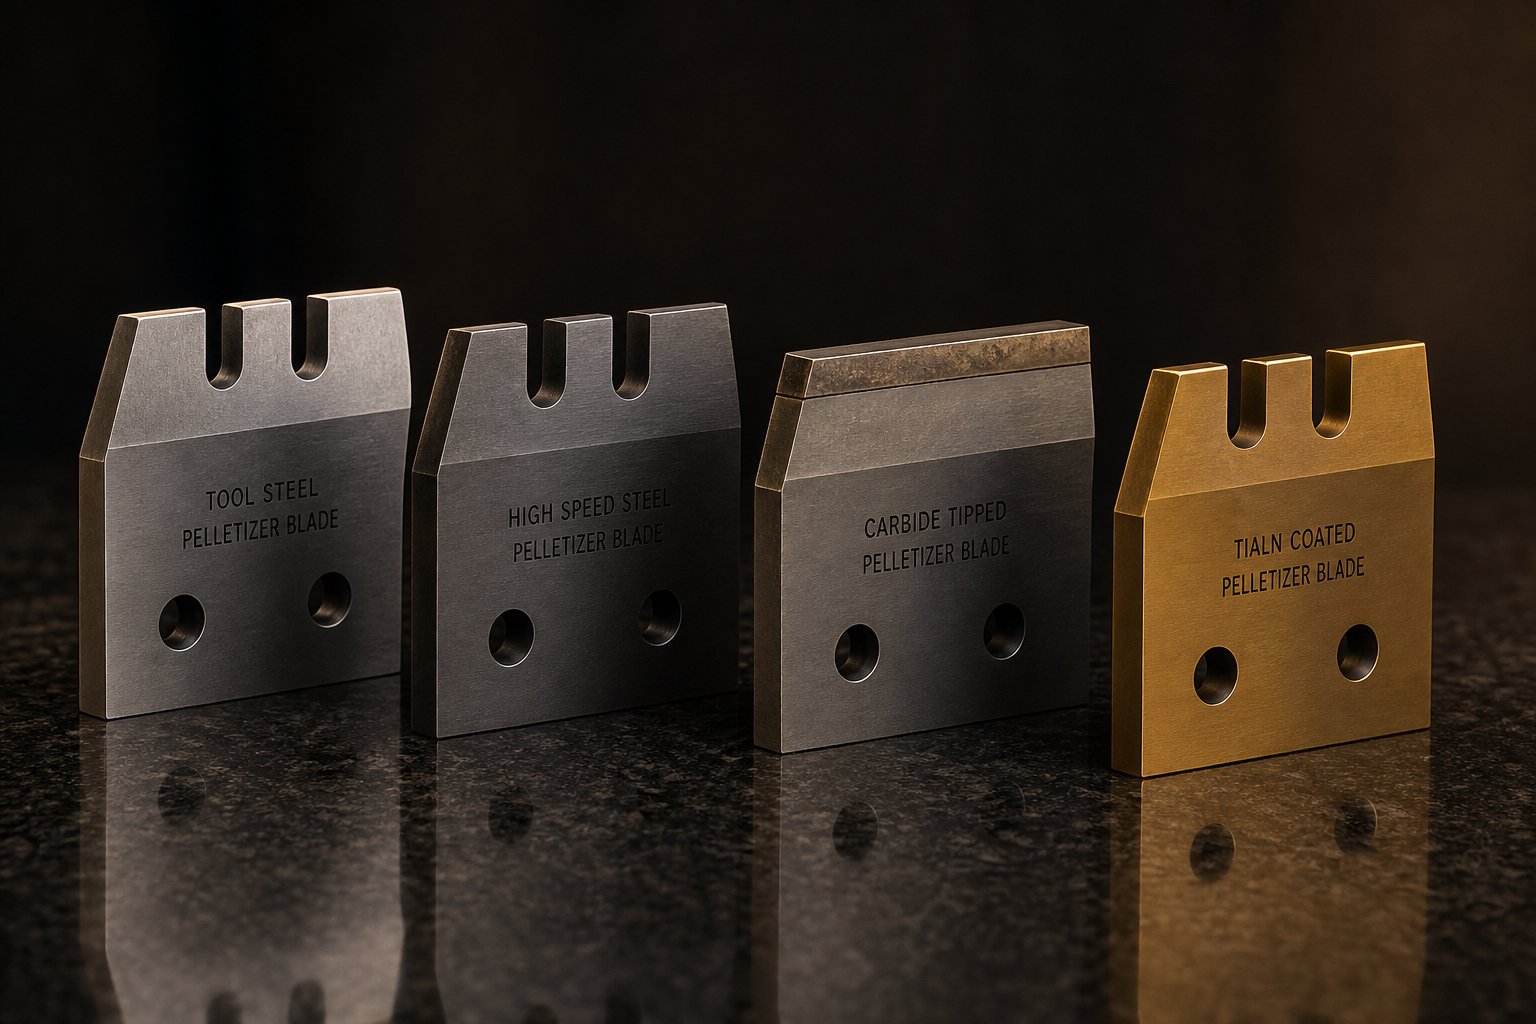
D2 Tool Steel is the workhorse of the pelletizing industry. A high-carbon, high-chromium cold-work steel, D2 typically achieves a hardness of HRC 58-62 and delivers good abrasive wear resistance thanks to its chromium carbide content. It's affordable, widely available on short lead times, and performs reliably for general-purpose pelletizing of unfilled polyolefins and standard engineering resins. The catch? D2's coarse M7C3 chromium carbides — a byproduct of conventional ingot casting — act as stress risers at the cutting edge. Under high-impact or misaligned conditions, those carbide clusters initiate microcracks that lead to chipping. If your dominant failure mode is edge chipping rather than gradual wear, a D2 tool steel pelletizer blade may cost you more in downtime than it saves in purchase price.
M2 High-Speed Steel (HSS) enters the picture when temperatures rise. M2 retains its hardness at elevated cutting temperatures far better than cold-work steels, making it a natural fit for hot die-face and underwater pelletizing systems where the blade contacts molten polymer. With working hardness in the HRC 62-67 range and excellent red hardness, M2 resists the thermal softening that causes D2 edges to roll or deform in hot-cut environments. The tradeoff is cost — HSS blades carry a premium over D2 — and somewhat lower impact toughness, which means they can chip under severe shock loading if the system isn't running smoothly.
CPM Powder Metallurgy Steels represent a significant step up in performance, and understanding why requires a quick look at how they're made. Unlike conventionally cast steels, CPM grades are produced through a powder metallurgy process that creates a fine, uniform dispersion of carbides throughout the matrix. That microstructural uniformity is a game-changer. It delivers a substantially better toughness-to-hardness ratio compared to ingot steels at equivalent hardness levels. Two grades dominate pelletizing applications: CPM 9V, which emphasizes toughness and resists edge chipping under intermittent impact, and CPM 10V (AISI A11), which pushes vanadium carbide content higher for exceptional abrasive wear resistance at working hardness up to HRC 62-64. When comparing CPM steel vs D2 for pelletizer knives, the performance gap becomes most visible in abrasive, filled-polymer applications: field trials on 30% glass-filled PP have shown CPM 10V reaching first regrind at roughly 420 operating hours versus 160 hours for conventional D2 under comparable conditions.
Stainless Steel Options fill a niche that the high-performance steels above don't address — corrosion resistance. Processing PVC, for instance, releases hydrochloric acid during thermal degradation, which aggressively attacks non-stainless blade surfaces. Similarly, hygroscopic polymers processed in water-ring or underwater systems expose blades to sustained moisture contact. Grades like 440C or specialized martensitic stainless steels provide adequate hardness (typically HRC 56-60) with meaningful corrosion protection. They won't match D2 or CPM grades in raw wear resistance, but in corrosive environments, a stainless blade that survives the chemistry outlasts a harder blade that corrodes and pits.
Advanced Materials for Demanding Applications
When conventional steels reach their limits — usually because filler content is high, production runs are long, or the cost of frequent blade changes outweighs the cost of premium tooling — advanced materials enter the conversation.
Tungsten Carbide (WC-Co) inserts or carbide-tipped blades deliver the highest abrasive wear resistance available for pelletizing applications. Sintered from tungsten carbide grains bonded with a cobalt binder, these materials achieve hardness levels of HRA 90+ (approximately HRC 75+), and their service life can be three to five times longer than standard steel blades processing the same abrasive compounds. The tungsten carbide pelletizer blade benefits are most dramatic on glass-filled, mineral-filled, and ceramic-loaded polymers where conventional steels dull within days. Carbide also supports more regrind cycles with tighter dimensional stability, which further reduces the cost-per-ton over the blade's lifetime.
The limitation? Brittleness. Tungsten carbide lacks the impact toughness of steel, so it performs poorly when subjected to high vibration, misaligned rotors, or intermittent shock loads. Selecting the right WC-Co grade matters enormously — higher cobalt content (K20 grades, for example) improves fracture resistance at the expense of some hardness, while lower cobalt grades (K10) maximize wear resistance but crack more readily under impact. Choosing between them depends on whether your line runs steady, stable throughput or deals with frequent startups, misfeeds, and process interruptions.
Ceramic-Tipped Blades represent an emerging technology for ultra-abrasive applications. Advanced ceramics like silicon nitride and zirconia-toughened alumina offer extreme hardness and chemical inertness, resisting both abrasion and polymer adhesion simultaneously. These materials show promise in specialty compounding operations running heavily loaded mineral or ceramic filler systems. However, ceramic-tipped pelletizing blades remain a niche solution — they're significantly more expensive than carbide, more sensitive to installation precision, and less forgiving of misalignment or impact events. For most operations, they're a technology to watch rather than one to adopt broadly today.
Surface Coatings as Performance Multipliers also deserve mention. Rather than changing the entire blade substrate, applying a thin-film coating — TiCN for abrasive wear reduction, TiAlN for heat resistance and anti-sticking performance, or chrome for corrosion protection — can meaningfully extend edge life on D2 or DC53 substrates. Coated D2 blades, for instance, offer a cost-effective middle ground: you retain the toughness and affordability of the base steel while gaining surface hardness that can exceed HRC 70+. This approach works especially well for operations that aren't ready to invest in full carbide tooling but need better-than-standard performance.
The table below consolidates the key properties of each material into a single reference so you can compare options side by side. Use it as a starting point for discussions with your blade supplier, not as a final specification — because the best steel for pelletizer blades in your plant depends on the specific intersection of polymer type, filler content, production volume, and budget.
| Material | Typical Hardness Range (HRC) | Wear Resistance | Corrosion Resistance | Toughness | Best-Fit Applications | Relative Cost Tier |
|---|---|---|---|---|---|---|
| D2 Tool Steel | 58-62 | High | Low-Moderate | Moderate | General-purpose pelletizing of unfilled or lightly filled polymers; strand systems | $ |
| DC53 (Enhanced D2) | 60-63 | High | Low-Moderate | Moderate-High | Medium-to-high load pelletizing; applications needing improved chipping resistance over D2 | $$ |
| M2 High-Speed Steel | 62-67 | High | Low | Moderate | Hot die-face and underwater pelletizing; high-temperature cutting environments | $$ |
| CPM 9V (Powder Metallurgy) | 54-58 | High | Low | High | High-impact pelletizing; recycled streams with contaminants; chipping-prone applications | $$$ |
| CPM 10V (Powder Metallurgy) | 60-64 | Very High | Low | Moderate-High | Glass-filled and mineral-filled compounds; high-abrasion, high-throughput lines | $$$ |
| Stainless Steel (440C) | 56-60 | Moderate | High | Moderate | PVC processing; moisture-exposed systems (underwater, water-ring); hygroscopic polymers | $$ |
| Tungsten Carbide (WC-Co K10-K20) | HRA 90+ (~75+ HRC equivalent) | Very High | High | Low-Moderate | Heavily filled compounds; steady-state, low-impact, high-abrasion environments | $$$$ |
| Ceramic-Tipped (Si3N4, ZTA) | HRA 92+ | Extremely High | Very High | Low | Ultra-abrasive specialty compounds; emerging niche applications | $$$$$ |
| D2 + WC or TiAlN Coating | Base: 58-62; Surface: 70+ | High-Very High | Moderate-High | Moderate (base steel) | Budget-conscious operations needing enhanced surface wear resistance without full carbide investment | $-$$ |
A few patterns emerge from this data. If you're processing clean, unfilled polyolefins on a strand pelletizer, D2 or DC53 delivers perfectly adequate performance at the lowest cost. Move into glass-filled or mineral-filled compounds and the calculus shifts — CPM 10V or tungsten carbide becomes the smarter investment because the dramatically longer edge life and fewer changeovers offset the higher purchase price. For hot-cut systems, M2 or CPM M4 earns its premium by resisting the thermal softening that destroys cold-work steels at the die face. And for corrosive environments, stainless grades protect against a failure mode that no amount of hardness can prevent.
The worst approach? Defaulting to the cheapest option across every application, or assuming the most expensive blade is automatically the best. Material selection is never one-size-fits-all. It demands honest assessment of your specific polymer, your filler loading, your production volume, and your tolerance for downtime — because those variables, not the catalog price, determine what a blade actually costs you per ton of pellets produced.
That relationship between hardness, toughness, and polymer type is worth exploring further, because the numbers in the table above only tell half the story. How those properties interact under real-world cutting conditions — and why a blade that's "too hard" can actually fail faster than a softer one — is where most material selection mistakes happen.
Blade Toughness vs Hardness for Pelletizing: Why the Numbers Alone Mislead
The material comparison table from the previous section gives you clean, organized data — HRC ranges, wear ratings, cost tiers. But here's the problem: those numbers describe how a pelletizer blade behaves in a lab, not what happens when it meets your polymer at 3,000 RPM on a Monday morning after a weekend shutdown. Real-world performance depends on how hardness and toughness interact under your specific cutting conditions, and that interaction trips up even experienced maintenance teams who assume harder always means better.
Understanding the Hardness-Toughness Tradeoff
Hardness and toughness pull in opposite directions. Increasing Rockwell hardness — pushing toward HRC 62, 64, or higher — improves edge retention and abrasive wear resistance. The cutting edge stays sharp longer, which means cleaner pellet cuts, less dust, and extended intervals between regrinds. Sounds ideal. But that same increase in hardness reduces the blade's ability to absorb sudden impact energy without fracturing. In metallurgical terms, you're trading ductility for rigidity.
Picture what this means in practice. A blade hardened to HRC 64 holds a razor-sharp edge beautifully during steady-state operation on clean, unfilled polypropylene. Then the line restarts after a purge cycle, and a semi-solidified slug of polymer hits the cutting edge at full rotor speed. A tough blade absorbs that shock, maybe dulling slightly at the impact point. A blade that's too hard for the application? It chips. Sometimes visibly — a chunk missing from the leading edge. Sometimes invisibly — hairline microcracks propagating beneath the surface, weakening the edge until it fails catastrophically during the next shift.
The reverse scenario is equally costly. A blade selected for maximum toughness — say, a lower-hardness stainless grade at HRC 54 — handles impact events gracefully but dulls rapidly under normal cutting. You'll notice pellet quality degrading faster: increasing dust generation, slight tailing on pellet edges, dimensional variation creeping outside spec. The blade survives, but it doesn't perform. You end up resharpening twice as often, doubling your downtime for blade changes and burning through regrind cycles that shorten the blade's total usable life.
This tradeoff isn't a flaw in blade design — it's a fundamental property of metallic cutting tools. The goal is never to maximize one property at the expense of the other. It's to find the intersection point where hardness and toughness are both adequate for the specific demands your polymer places on the cutting edge.
Matching Blade Specs to Polymer Families
So how do you find that intersection? Start with the polymer. Different resin families impose radically different stress profiles on the blade, and understanding those profiles is the fastest path to selecting the right material grade.
Unfilled Polyolefins (PE, PP) are the gentlest feedstocks a pelletizer blade encounters. These soft, low-melting-point resins generate minimal abrasive wear and relatively low cutting forces. A moderate-hardness steel — D2 at HRC 58-60, for instance — delivers excellent service life without any risk of chipping. There's simply no need to pay for premium CPM steels or tungsten carbide when processing clean HDPE or PP. The economics don't justify it. Save the advanced materials for applications that actually demand them.
Engineering Resins (Nylon/PA, PBT, POM) raise the stakes. These polymers process at higher melt temperatures, often exceeding 250 degrees Celsius in hot-cut systems, which means the blade experiences greater thermal stress at the cutting edge. A pelletizer knife for engineering resins also faces higher mechanical cutting forces because these materials are stiffer and more resistant to shearing than polyolefins. M2 high-speed steel earns its place here — its red hardness prevents the thermal softening that causes D2 edges to roll and deform under sustained heat exposure. For strand pelletizing of nylon or PBT, a high-quality D2 or DC53 blade often works well since the polymer cools before cutting, but in underwater or die-face systems processing the same resins, stepping up to HSS or CPM grades pays for itself in reduced changeover frequency.
Glass-Filled and Mineral-Filled Compounds represent the most blade-destructive category in plastics processing. Glass fibers — typically 10% to 50% by weight in reinforced nylon, PBT, or polypropylene — act like abrasive sandpaper against the cutting edge. Every pellet cut grinds microscopically at the blade surface, accelerating edge recession far beyond what unfilled resins produce. Mineral fillers like calcium carbonate, talc, and wollastonite create similar abrasive conditions, though generally less severe than glass. The pelletizer blade hardness for glass-filled polymer applications needs to be at the top of the available range — CPM 10V, with its dense vanadium carbide network, or tungsten carbide inserts that resist abrasive wear an order of magnitude better than conventional tool steels. Wear testing data shows carbide-tipped blades lasting five to eight times longer than standard D2 on heavily filled compounds, a difference that translates directly into fewer line stoppages and lower cost per ton.
Recycled Polymer Streams present a uniquely difficult challenge — and one that's growing as recycled content mandates increase across the industry. Unlike virgin resin, post-consumer or post-industrial recycled feedstock is inherently unpredictable. A bale of recycled HDPE might contain metal fragments from caps or closures, paper label remnants, mixed polymer contaminants, sand, or even small stones. Each of these foreign materials creates a different type of stress event at the blade edge: metal fragments cause impact shock, sand and minerals cause abrasion, and mixed polymers create inconsistent cutting resistance that fluctuates from pellet to pellet.
This unpredictability is precisely why the best pelletizer blade for recycled plastic often isn't the hardest one available. A tungsten carbide edge that shrugs off glass fiber abrasion may crack when it strikes a small metal fragment hidden in a recycled stream. For recyclers, tougher blade materials — CPM 9V with its excellent impact resistance, or even a well-heat-treated DC53 — frequently outperform harder, more brittle options. The blade may dull slightly faster than carbide on abrasive contaminants, but it survives the random impact events that would chip or fracture a harder edge. In recycling operations, blade survival matters more than peak edge retention because an unplanned blade change during a production run costs far more than a scheduled regrind.
Optimal pelletizer blade selection balances hardness for edge retention against toughness for impact resistance, calibrated to the specific polymer being processed. No single blade material is universally "best" — only best for your application.
This polymer-driven approach to blade selection also explains why maintenance teams should resist the temptation to standardize on a single blade material across an entire plant. A facility running three pelletizing lines — one on clean PP, one on 30% glass-filled nylon, and one on post-consumer recycled PE — genuinely needs three different blade specifications. Using the same D2 blade on all three lines guarantees you're overspending on the PP line, underperforming on the glass-filled line, and risking catastrophic chipping on the recycling line. Matching the blade to the polymer isn't an indulgence — it's the most direct path to lower total operating cost.
Of course, even the perfect material selection can't compensate for a blade that's poorly installed. The gap between theory and practice narrows or widens at the mounting stage, where alignment precision and torque specifications determine whether a well-chosen blade delivers its full potential or fails prematurely from uneven loading.
How to Align Pelletizer Blades: Mounting and Gap Setting Best Practices
You've chosen the right material grade. You've matched hardness and toughness to your polymer. And none of it matters if the blade goes onto the rotor crooked. Improper mounting is one of the leading causes of premature blade failure and inconsistent pellet quality — yet it's the step that gets the least attention in most maintenance routines. A blade that's slightly cocked in its holder, a fastener torqued unevenly, a gap that's off by a fraction of a millimeter — any of these turns a well-engineered cutting tool into an expensive source of scrap and downtime.
Why Blade Alignment Is Critical
The gap between the rotary blade and the bed knife — or between the blade and the die plate in hot-cut systems — must be held within remarkably tight tolerances. For underwater and die-face pelletizers, industry guidelines recommend a clearance of 0.2 to 0.3 mm for clean cuts and minimal fines. In strand pelletizers, the pelletizer bed knife gap tolerance can be even tighter depending on the pellet diameter and polymer stiffness. You're working in hundredths of a millimeter — a range where human perception fails and only instruments give reliable answers.
What happens when the gap drifts outside spec? An excessive gap means the blade doesn't fully shear the polymer strand or melt bead. Instead of a clean cut, you get tails, strings, and partially severed pellets that stick together or produce angel hair. The blade essentially swipes past the material without completing the shearing action.
An insufficient gap creates the opposite — and arguably more dangerous — problem. The rotary blade contacts the bed knife or die plate directly, generating metal-on-metal friction that accelerates wear on both components simultaneously. Heat builds rapidly at the contact zone, potentially softening the blade edge and creating sparking hazards in environments where polymer dust or volatile off-gasses are present. One maintenance engineer's shortcut on gap setting can cascade into blade replacement, bed knife resurfacing, and a safety incident investigation.
Mounting Best Practices and Gap Setting
Proper pelletizer blade mounting best practices follow a deliberate sequence. Rushing through installation — or skipping verification steps — is where most alignment errors originate. The procedure below applies broadly across strand, underwater, and die-face systems, though you should always confirm machine-specific torque values and gap specs against your OEM documentation, since these vary significantly between pelletizer models and manufacturers.
- Lock out the machine. De-energize the pelletizer and apply lockout/tagout devices before touching any blade component. Never rely on stop buttons alone.
- Inspect the rotor and blade holders. Clean all mounting surfaces thoroughly. Check for burrs, debris, polymer residue, or thread damage on bolt holes. Even a small particle trapped under a blade seat tilts the cutting edge and creates an uneven gap across the blade's width.
- Verify blade flatness. Place each new or resharpened blade on a known-flat surface (a granite surface plate is ideal). Look for rocking or light gaps under the blade. A warped blade cannot be aligned properly regardless of how carefully you set the gap.
- Seat the blade and hand-start fasteners. Position the blade in the holder and thread bolts finger-tight only. Do not force cross-threaded fasteners — replace any bolt that doesn't turn smoothly by hand.
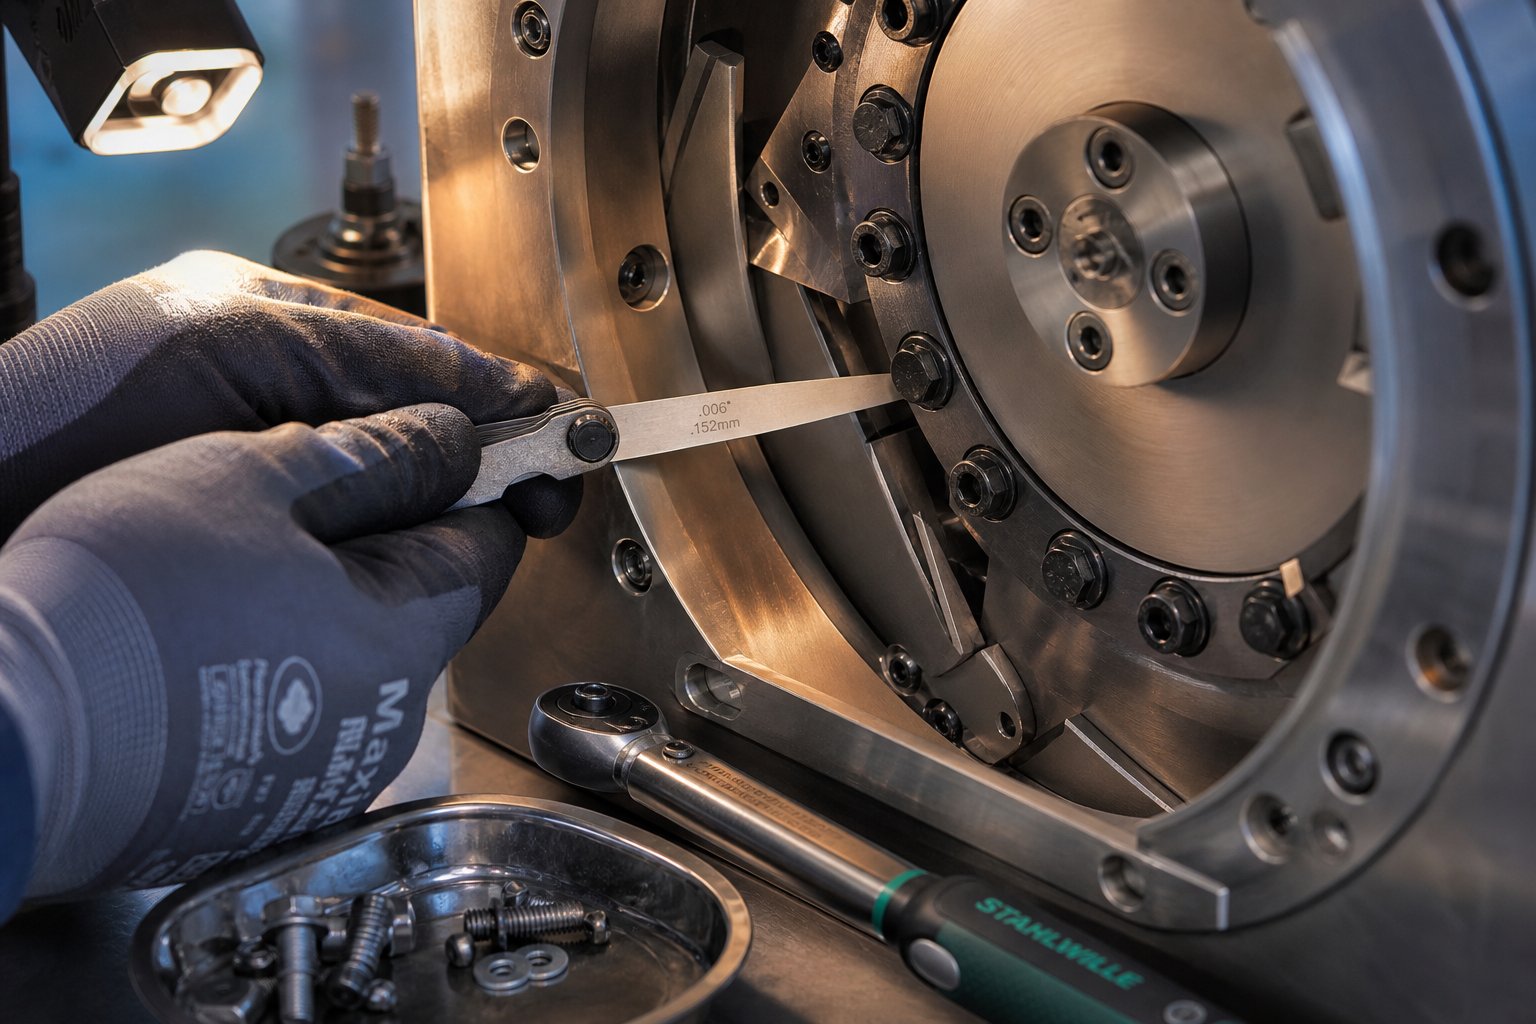
- Torque fasteners in a crisscross pattern. Using a calibrated torque wrench, tighten bolts to the manufacturer's specification in a star or crisscross sequence, just as you would torque a cylinder head. This distributes clamping force evenly and prevents the blade from shifting or seating at an angle.
- Measure the gap at multiple positions. Use feeler gauges or a dial indicator to check the clearance between the cutting edge and the bed knife (or die plate) at the inboard end, center, and outboard end of every blade position. The pelletizer blade gap setting procedure demands uniform clearance across the full sweep — a gap that's correct at the center but tight on one end will produce uneven cuts and asymmetric wear.
- Repeat for all blade positions. A single improperly seated blade creates imbalanced cutting forces that propagate wear to adjacent blades and the rotor itself. Check every position, not just the one you replaced.
- Perform a hand-rotation test. Slowly turn the rotor by hand through several complete revolutions. Listen and feel for any contact, dragging, or interference. If you detect scraping, stop immediately, identify the binding position, and re-check alignment.
- Run a low-speed test. Start the pelletizer at reduced RPM with no material feed. Listen for abnormal sounds or vibration. Gradually bring the system to operating speed and monitor pellet quality on the first production run, watching specifically for tailing, fines, or inconsistent pellet length that would signal a gap problem.
One point deserves extra emphasis: uneven torque is invisible but destructive. If one bolt on a blade holder is tightened to 25 Nm while its neighbor sits at 18 Nm, the blade flexes microscopically under cutting load. That flex creates a cyclic stress concentration that accelerates fatigue cracking at the bolt hole — a failure mode that shows up weeks later as a cracked blade with no obvious external cause. A calibrated torque wrench isn't optional equipment. It's the difference between a blade that delivers its rated service life and one that fails unpredictably mid-run.
Alignment precision also compounds over time. A blade set installed with verified, uniform gaps will wear evenly, maintain consistent pellet quality longer, and reach its regrind interval predictably. A set installed with sloppy tolerances wears unevenly from the first hour — some blades dull faster, others chip, and the maintenance team ends up chasing pellet quality problems that originated entirely at the mounting stage. Getting the installation right is the highest-leverage maintenance activity available: it costs nothing extra in parts, only discipline and a few additional minutes of verification.
Even with perfect alignment, though, blades are consumable components. They dull, they wear, and eventually they reach a point where no amount of resharpening can restore a usable edge. Knowing when that point arrives — and having a clear protocol for sharpening, inspection, and replacement decisions — separates reactive maintenance from proactive blade management.
Maintenance Protocols for Pelletizer Blades: Sharpening, Inspection, and Replacement
A perfectly aligned, correctly specified pelletizer blade still has a finite lifespan. Every cut dulls the edge microscopically. Every production hour chips away at the margin between "good pellets" and "quality drift." The real question isn't whether a blade will need attention — it's whether your maintenance protocol catches that moment before your pellets tell your customers for you. Too many facilities treat blade maintenance reactively: they wait for visible defects in the product, then scramble to sharpen or swap blades under time pressure. A smarter approach ties sharpening, inspection, and replacement decisions to measurable indicators rather than guesswork or arbitrary calendar schedules.
Sharpening Schedules and Regrinding Tolerances
How often should you sharpen pelletizer blades? The honest answer is: it depends entirely on what you're cutting, how fast you're cutting it, and what the blade is made from. A D2 blade processing clean HDPE on a strand line may run for weeks before needing attention. That same blade on a 30% glass-filled nylon line could dull in days. Tying sharpening intervals to a fixed calendar — "regrind every two weeks" — guarantees you're either sharpening too early (wasting usable edge life) or too late (producing substandard pellets for hours before anyone notices).
Instead, monitor pellet quality indicators as your primary sharpening trigger. Increasing dust or fines generation is the earliest warning sign — it means the blade is tearing rather than cleanly shearing the polymer. Tailing on pellet edges comes next, followed by measurable dimensional variation in pellet length or diameter. Industry practitioners also recommend tracking RPM drift: if your pelletizer normally runs at a consistent speed with fresh blades, a spike in RPM often indicates the motor is compensating for dull knives that require more force to cut. Some facilities prefer a tonnage-based metric instead — after the pelletizer processes a specified weight of material, blades are pulled for inspection regardless of visual pellet quality.
When the blade does reach the grinder, understanding pelletizer blade regrinding tolerance is critical to getting maximum life from each set. Every regrind cycle removes a thin layer of material from the cutting face to restore a sharp, uniform edge. Done correctly — with minimal material removal using precision surface grinders — a single blade can support multiple regrind cycles before it reaches its minimum thickness specification. The exact number depends on the blade's original dimensions, the amount of material removed per cycle, and the manufacturer's minimum thickness limit.
Here's where discipline pays off. Sharpening specialists note that timely, proactive regrinding allows minimal material removal per cycle, maximizing the total number of sharpenings before replacement becomes necessary. Delay the regrind too long, and the operator must remove significantly more material to get past the damage zone — deep nicks, rolled edges, or microcracking that has propagated below the surface. One or two extra sharpenings per year, made possible by catching dullness early, can eliminate an entire blade replacement cycle. At the cost difference between a regrind and a new blade, those savings compound rapidly across a multi-line facility.
For rotor blades specifically, professional regrinding services follow a multi-step process: the cutting edge is precision-ground, the rotor face is trued to remove imperfections, the gullet and flute geometry are restored to original specifications, and the outer diameter is ground to guarantee concentricity — ensuring the rotor can be set back to a gap tolerance as tight as 0.001 to 0.002 inches against the bed knife.
Inspection Methods and Replace-vs-Resharpen Decisions
Every blade change — whether for regrinding or replacement — should include a thorough inspection. Think of it as a pelletizer blade inspection checklist that runs automatically each time a blade comes off the rotor or out of the holder.
Start with visual inspection under good lighting. Look for edge chips — small divots or missing sections along the cutting edge that indicate impact damage or material fatigue. Check for cracks, which may appear as fine hairlines running perpendicular to the edge or radiating from bolt holes. Examine the blade surface for heat discoloration — blue or straw-colored tinting that signals the blade experienced temperatures high enough to alter its temper, potentially softening the edge zone and reducing its effective hardness.
Uneven wear patterns deserve special attention because they often reveal problems beyond the blade itself. If one end of a blade is significantly more worn than the other, or if certain positions on the rotor show heavier wear than adjacent ones, the root cause is almost certainly an alignment issue — not blade end-of-life. Replacing a blade without correcting the underlying misalignment simply sends the next blade down the same accelerated-wear path. Asymmetric wear is a diagnostic signal, not just a maintenance trigger.
So when should you resharpen, and when is it time to replace? The decision rests on a clear set of criteria:
- Remaining material thickness: Measure the blade against the manufacturer's minimum thickness specification. If regrinding would bring the blade below that limit, it must be retired regardless of edge condition.
- Crack or chip severity: Small edge chips confined to the outermost edge zone can often be ground away during resharpening. Cracks extending deeper into the blade body, or chips that reach past the edge zone into the blade face, compromise structural integrity and warrant replacement.
- Number of prior regrind cycles: Each blade has a finite regrind budget. Track how many times each blade has been resharpened. As the blade approaches its limit, the remaining material margin shrinks and the risk of grinding through to an unusable geometry increases.
- Ability to restore uniform edge geometry: If the blade has worn unevenly — cupped, tapered, or hollowed — and cannot be ground back to a flat, consistent edge profile, resharpening will produce a blade that cuts unevenly from day one. Replace it.
Documenting these inspections creates a maintenance history that reveals patterns. You might discover that blades in certain rotor positions consistently wear faster, pointing to a balance or alignment issue worth investigating. Or you might find that a particular blade material consistently delivers one more regrind cycle than the grade you used previously — data that directly informs your next purchasing decision.
For maintenance teams managing planned blade changes, keeping a ready inventory of replacement blades eliminates the scramble that accompanies unplanned failures. Sourcing those replacements based on drawings, samples, or measured dimensions — as offered by suppliers like NANHAIYA — gives you the flexibility to maintain stock without being locked into a single OEM channel or constrained by long lead times. Having spares on the shelf transforms blade changes from emergency events into scheduled maintenance tasks, cutting both downtime and stress.
Disciplined maintenance extends blade life. But even the best-maintained blade can't fix a pellet defect that originates somewhere else in the process. Knowing how to trace a quality problem back to its actual root cause — whether that's the blade, the die, the melt temperature, or something else entirely — requires a systematic troubleshooting framework that separates blade-related defects from everything else on the line.
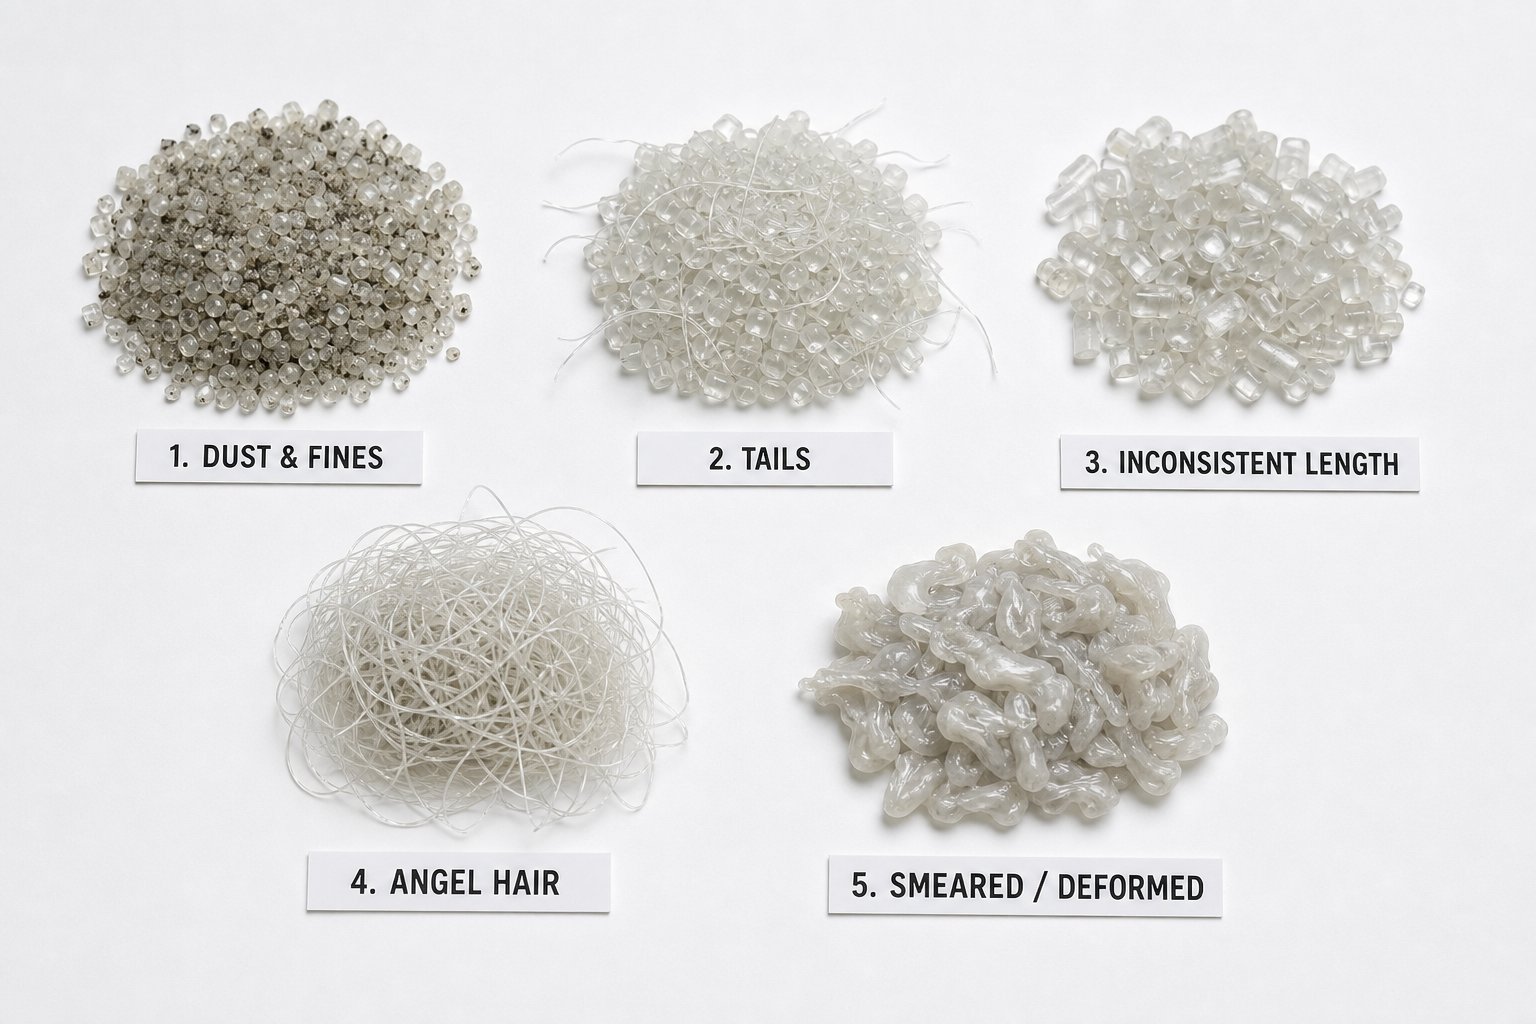
Troubleshooting Pellet Defects Caused by Blade Issues
Your maintenance protocols are solid. Your sharpening schedule is dialed in. And yet — pellets are coming off the line with tails, dust levels are climbing, or lengths are drifting out of spec. What's actually going wrong? The instinct is to pull the blades, and sometimes that's the right call. But reaching for a blade swap before diagnosing the root cause is like replacing your car's tires every time the steering feels off. You might fix the symptom by accident, or you might burn through expensive consumables while the real problem — a misaligned rotor, a worn die plate, a temperature drift — keeps quietly wrecking your output.
The troubleshooting framework below maps the most common pellet defects to their probable blade-related causes, giving maintenance teams a systematic way to pinpoint whether the pelletizer blade is genuinely at fault — or whether the answer lies elsewhere in the process.
Pellet Defects and Their Blade-Related Causes
When pellet quality deteriorates, the defect itself tells you a story. Each type of visual anomaly points toward a specific failure mechanism at the cutting stage. The table below consolidates the five most frequent blade-related defects, what they look like, why they happen, and what to do about them.
| Defect Type | Visual Description | Probable Blade Cause | Corrective Action |
|---|---|---|---|
| Excessive fines or dust | Fine powder accumulating in the pellet stream, on conveyor belts, or in collection bins; pellets feel rough or chalky | Dull blades tearing rather than shearing the polymer; excessive blade-to-bed-knife gap allowing partial cuts; blade material too soft for the polymer's abrasiveness | Inspect and resharpen or replace blades; verify gap is within spec (typically 0.2-0.3 mm); evaluate whether a harder blade material or carbide-tipped option is warranted for the polymer being processed |
| Tailing or stringing | Thin whisker-like tails trailing from one or both ends of the pellet; pellets appear "hairy" or have small projections | Dull cutting edge failing to complete a clean shear; gap too wide so the blade swipes past the strand without fully severing it; blade not making uniform contact across its full width | Resharpen or replace blades; reduce gap to manufacturer spec; check blade seating for debris or warping that prevents full-width contact; in die-face systems, increase blade contact pressure via adjustment screws or pneumatic settings |
| Inconsistent pellet length | Pellets in the same batch vary noticeably in length; some are long, others short, with no consistent pattern | Uneven blade wear across rotor positions; one or more blades seated incorrectly or at a different height; rotor imbalance causing variable contact force | Inspect all blade positions for uniform wear and proper seating; re-torque fasteners in crisscross pattern; check rotor balance; verify cutter speed matches extruder output rate |
| Angel hair | Long, thin filaments of polymer — sometimes curled or tangled — appearing in the pellet stream or wrapping around equipment | Blade gap too tight on hot-cut systems, causing the blade to smear rather than sever molten polymer; polymer adhesion to the blade surface creating drag-out filaments | Widen the gap incrementally; apply or reapply anti-stick coatings (TiAlN, CrN) if polymer adhesion is the driver; verify blade surface is polished and free of scoring; check that process water temperature is adequate for quenching |
| Deformed or smeared pellets | Pellets appear flattened, elongated, or have a glossy smeared surface; edges look melted rather than cut | Blade overheating in hot-cut applications due to excessive friction or insufficient cooling; wrong blade material for the thermal environment (blade softening at operating temperature) | Check cooling water flow rate and temperature; verify blade material has adequate red hardness for the application (consider M2 HSS or CPM grades); inspect for metal-on-metal contact generating excess heat; confirm gap is not too tight |
A few patterns jump out from this table. Dull blades and incorrect gap settings account for the majority of blade-related defects. Troubleshooting pellet dust from blade wear, for instance, almost always starts with edge inspection — industry sources confirm that a dull blade begins to "tear" instead of cut, producing irregular shapes and excessive fines while simultaneously spiking energy consumption as the motor works harder to force the cuts. Pellet tailing caused by a dull blade follows the same root mechanism: the edge has lost the sharpness needed for a complete shear, leaving behind thin whiskers of un-severed polymer.
The angel hair defect pelletizer blade fix deserves particular attention because it's counterintuitive. Operators often assume angel hair means the blades need sharpening. In hot-cut systems, though, the cause is frequently the opposite problem — the gap is too tight, pressing the blade against the die face hard enough to smear the melt rather than sever it cleanly. Polymer drags along the blade surface and spins off as long, wispy filaments. Loosening the gap slightly, or restoring a worn anti-adhesion coating, often eliminates the issue without touching the blade edge at all.
Inconsistent pellet size blade alignment issues are equally deceptive. When pellet lengths vary randomly within the same run, the natural assumption is that the blades are worn. But if only one or two positions on the rotor show heavier wear or different seating heights, the real culprit is mechanical — an improperly seated blade, a damaged holder, or a rotor that's slightly out of balance. Swapping all the blades without checking these mechanical factors simply resets the clock on the same failure mode.
Systematic Diagnosis Before Blade Replacement
Here's the critical point that separates effective troubleshooting from expensive guesswork: not every pellet quality issue is a blade problem. Die condition, melt temperature, cooling water temperature, throughput rate, and even feedstock variability all interact with blade performance. Davis-Standard's pellet quality guide emphasizes that most pellet defects have multiple causes, and addressing one variable at a time — then allowing time to observe the effect — is the only reliable way to isolate the true root cause.
Before pulling blades off the rotor, work through this diagnostic sequence:
- Rule out process parameter changes. Has anything shifted upstream? Melt temperature, extruder throughput, die pressure, cooling water temperature, or raw material lot? Even a five-degree change in melt temperature can alter polymer viscosity enough to affect cut quality. Check process logs before assuming the blade is at fault.
- Inspect the die plate or die head. Worn or partially blocked die holes extrude inconsistent strands or melt beads, which no blade — no matter how sharp — can cut uniformly. If die holes have become elongated or "pear-shaped" from abrasion, the die plate itself needs replacement, not the blades.
- Inspect blade condition. Pull a representative blade and examine it under good lighting. Look for edge dullness, chipping, cracks, heat discoloration, and polymer buildup. Compare the wear pattern across multiple blade positions — uniform wear suggests normal service life, while asymmetric wear signals alignment or balance problems.
- Check alignment and gap settings. Verify the clearance between the rotary blade and bed knife (or die face) at multiple points using feeler gauges or dial indicators. Even if blades were aligned correctly during the last installation, thermal expansion during operation, fastener relaxation, or vibration can shift tolerances over time.
- Evaluate blade material suitability. If blades are dulling or chipping far faster than expected despite correct alignment and process parameters, the issue may be a mismatch between blade material and polymer demands. A D2 blade running on a 40% glass-filled compound, for example, will never deliver acceptable service life — the problem isn't the individual blade but the material specification.
This sequence saves time and money by preventing unnecessary blade replacements. A maintenance team that follows it consistently will discover — often to their surprise — that a significant percentage of "blade problems" actually originate in process parameters or die condition. Fixing those upstream issues first means the new blades you do install will perform to their full potential rather than failing prematurely for the same reasons their predecessors did.
Accurate diagnosis also reshapes how you think about blade costs. A blade that's replaced prematurely because the real problem was a blocked die hole represents pure waste — the cost of the blade, the downtime for the changeover, and the alignment work that didn't need to happen. Multiply that by a dozen false replacements per year across multiple lines, and the hidden cost of poor troubleshooting begins to rival the blade budget itself. That connection between diagnosis quality and true operating cost is exactly where most procurement decisions go wrong — and where a total-cost-of-ownership perspective reveals what price-per-blade comparisons miss entirely.
Total Cost of Ownership and Sourcing Strategies for Pelletizer Blades
A procurement manager compares two quotes. One pelletizer blade costs $85; the other costs $140. The $85 blade wins on the spreadsheet every time. But spreadsheets don't run pelletizing lines — and that cheaper blade might be the most expensive choice the plant makes all year. The pelletizer blade total cost of ownership extends far beyond the number on the purchase order, and until you account for every cost that blade generates across its entire service life, you're making purchasing decisions with incomplete data.
Calculating the True Cost of a Pelletizer Blade
The purchase price of a blade is the visible tip of a much larger cost structure. Beneath the surface, several factors quietly compound to determine what each blade actually costs per ton of pellets produced. Industry data reinforces the scale of these hidden expenses — maintenance cost analyses show that the fully loaded cost of unplanned downtime in a mid-size manufacturing plant runs two to five times higher than basic estimates suggest, because most of the expense lives in categories that never appear on the work order.
Here's what a pelletizer blade cost per ton calculation needs to include:
- Regrind cycle capacity: A blade supporting six regrind cycles before retirement spreads its purchase cost across seven usable lifetimes. A cheaper blade that only tolerates three regrinds — because softer steel requires deeper material removal each pass — delivers barely half the total edge life at a deceptively lower sticker price.
- Downtime for blade changes: Every changeover requires machine shutdown, lockout/tagout, blade removal, installation, gap verification, and a test run before production resumes. A blade that lasts 40% longer between changes eliminates multiple shutdowns per year — each one representing lost output, idle labor, and recovery time.
- Pellet quality losses during the wear period: Blades don't go from sharp to dull in an instant. They degrade gradually, and during that final stretch before each regrind, dust levels rise, tailing increases, and dimensional consistency slips. Those borderline pellets get downgraded, reprocessed, or — worst case — shipped to a customer who notices the quality drift before you do.
- Energy consumption increases: Dull blades require more cutting force. The pelletizer motor compensates by drawing more current, and that incremental energy cost accumulates silently across every production hour between sharpenings.
- Collateral component wear: A blade made from the wrong material or one that dulls prematurely accelerates wear on the bed knife, the die plate, and even the rotor itself. Those components cost far more to replace than the blade that damaged them.
When you stack these factors together, a more expensive blade that maintains edge quality longer and supports more regrind cycles frequently delivers a substantially lower cost per ton of pellets produced. OEM qualification frameworks use a metric called "$/edge-hour" — the blade's total cost (purchase price plus regrinds plus changeover labor) divided by its productive cutting hours — to make apples-to-apples comparisons that strip away the distortion of unit price alone. Running that calculation on your last two blade purchases will almost certainly reveal that the "cheaper" option wasn't.
The purchase price of a pelletizer blade represents only a fraction of its real cost. The true measure is cost per ton of pellets produced — a number shaped by regrind life, downtime, quality losses, and energy draw, not just the invoice.
Smart Sourcing Strategies for Replacement Blades
Understanding total cost changes how you source replacements, not just how you evaluate them. The most resilient maintenance operations avoid single-source dependency by keeping dimensional records — drawings, measured dimensions, photographs, and sample blades — that allow them to qualify multiple suppliers and maintain competitive sourcing options.
Several strategies work in practice, and the smartest procurement teams combine more than one:
- Custom manufacturing from drawings or samples: Suppliers like NANHAIYA manufacture pelletizing blades and other critical extruder spare parts — including screw tips, die heads, and screen packs — based on customer-provided drawings, samples, photos, or measured dimensions. This approach gives maintenance teams and machine rebuilders access to precise replacements without OEM lead times or minimum order constraints, making it particularly valuable for older or discontinued pelletizer models where original parts are scarce.
- OEM purchasing: Buying directly from the pelletizer manufacturer guarantees exact-spec components and preserves warranty coverage. The tradeoff is typically longer lead times, higher prices, and minimum order quantities that don't always match your consumption rate.
- Local regrinding services: Partnering with a nearby precision grinding shop for scheduled resharpening reduces turnaround time and shipping costs compared to sending blades back to the manufacturer. Verify that the service provider can hold the flatness and edge geometry tolerances your system requires — not all grinding shops have experience with pelletizer tooling.
- Maintaining a qualified aftermarket pelletizer blade supplier: Building relationships with two or more qualified sources — and periodically validating their output against your dimensional and hardness specifications — ensures you're never hostage to a single vendor's lead time, pricing spike, or supply disruption.
The key enabler across all of these strategies is documentation. Measure your blades. Record the dimensions, material grade, hardness specification, and any coating requirements. Photograph the blade from multiple angles, including the mounting features. Store this data where your maintenance and procurement teams can both access it. A complete dimensional record transforms how to source replacement pelletizer blades from a frantic, reactive scramble into a routine purchasing decision — one where you control the timeline, the vendor selection, and the cost.
Pelletizer blades are consumables, but the costs they generate — or prevent — are anything but disposable. The facilities that treat blade procurement as a total-cost-of-ownership decision, rather than a line item to minimize, consistently run longer between unplanned stops, produce tighter pellet specs, and spend less per ton than competitors still chasing the lowest quote. The blade is small. Its impact on your bottom line is not.
Frequently Asked Questions About Pelletizer Blades
1. What is the difference between a pelletizer blade and a granulator blade?
A pelletizer blade cuts extruded polymer into uniform, finished pellets at the end of an extrusion line, while a granulator blade shreds or grinds plastic waste into irregular flakes for size reduction before further processing. They serve fundamentally different purposes: pelletizer blades produce the final product, and granulator blades prepare scrap material. Confusing the two when ordering replacements leads to receiving the wrong part entirely, so always confirm whether your equipment is a pelletizer or a granulator before sourcing blades.
2. How often should pelletizer blades be sharpened or replaced?
Sharpening intervals should be driven by pellet quality indicators rather than fixed calendar schedules. Watch for increasing dust or fines, tailing on pellet edges, and measurable variation in pellet dimensions — these signal that the blade edge is tearing rather than cleanly shearing. Some facilities also track motor RPM drift or tonnage processed as triggers. Each blade supports a finite number of regrind cycles before reaching its minimum thickness specification. Timely, proactive resharpening with minimal material removal per pass maximizes total regrind cycles and extends overall blade life. Suppliers like NANHAIYA (nhyscrews.com) can manufacture replacement blades from drawings or samples, helping maintenance teams keep spares on hand for planned changes.
3. What is the best pelletizer blade material for glass-filled polymers?
Glass-filled compounds are the most abrasive materials a pelletizer blade encounters, so high wear resistance is essential. CPM 10V powder metallurgy steel and tungsten carbide (WC-Co) inserts are the top choices. CPM 10V offers a dense vanadium carbide network that resists abrasive edge recession while maintaining reasonable toughness. Tungsten carbide provides even greater wear resistance — lasting three to five times longer than standard D2 tool steel on heavily filled compounds — but is more brittle and performs best in stable, low-impact operating conditions. The right choice depends on whether your line runs steady-state production or experiences frequent startups and process interruptions.
4. How do you set the correct gap between a pelletizer blade and bed knife?
The blade-to-bed-knife gap typically needs to be held within hundredths of a millimeter — around 0.2 to 0.3 mm for many die-face systems, though OEM specifications vary by machine model. Use feeler gauges or a dial indicator to measure clearance at the inboard end, center, and outboard end of every blade position. The gap must be uniform across the full sweep. An excessive gap produces tails and incomplete cuts, while an insufficient gap causes metal-on-metal contact, accelerated wear, heat buildup, and potential sparking hazards. Always torque fasteners in a crisscross pattern with a calibrated wrench before measuring, and perform a slow hand-rotation test to check for interference.
5. Why are my pellets producing excessive dust or angel hair?
Excessive dust typically points to dull blades that tear the polymer instead of shearing it cleanly, or to a blade-to-bed-knife gap that is too wide for a complete cut. Switching to a harder blade material may also help if the current grade cannot maintain its edge against your polymer's abrasiveness. Angel hair, on the other hand, is often caused by the opposite problem in hot-cut systems — the gap is too tight, pressing the blade against the die face hard enough to smear molten polymer into long filaments. Restoring worn anti-adhesion coatings such as TiAlN or CrN, or slightly widening the gap, frequently resolves angel hair without blade replacement. Always rule out upstream process changes — melt temperature, die condition, and cooling water temperature — before assuming the blade is at fault.
Written by
Nanhaiya Technical Team
Zhoushan Nanhaiya Plastic Machinery Co., Ltd.
The Nanhaiya technical team supports screw and barrel manufacturing projects through application review, technical communication, custom manufacturing coordination, and production and quality control.
Discuss Your Application
Related Articles
More insights on screw barrel technology and plastics processing.

What Nobody Tells You About Screw Barrel For Plastic Machine Design
Oct 10, 2026
Learn how screw barrel for plastic machine design affects melt quality, throughput, and wear life. Covers geometry, resin matching, troubleshooting, and sourcing.
Read Article
Single Screw Extruder for Sheet: Stop Guessing, Start Specifying
Oct 9, 2026
Learn how to specify a single screw extruder for sheet production. Covers screw geometry, resin-specific processing, troubleshooting, and maintenance best practices.
Read Article
PE Pipe Extruder Machine: What Datasheets Won't Tell You
Oct 9, 2026
Learn how a PE pipe extruder machine works, key specs explained, material grade selection, maintenance tips, and buyer guidance beyond the datasheet.
Read ArticleLooking for something else?
Search by material, symptom or product and jump straight to the relevant page.
These are navigation suggestions based on keyword matching — not a quotation, not a delivery commitment, and not a substitute for engineering review. Final specification is confirmed by our engineers against your drawings and processed material.
Need help with screw barrel selection?
Share your machine model, processed material and application. Our team can help with pricing and technical support.